June 30, 2012

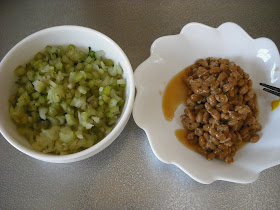
Turnip Greens Nukazuke/かぶの葉のぬか漬け

I wanted to buy some daikon greens so I could pickle them in my nukadoko.  I found them sold at a supermarket that were suitable for making nameshi, but I also found turnips with greens sold cheap, so I bought them instead, hoping that turnip greens would be similar to daikon greens.
ぬか漬けにするため、大根の葉っぱを買いたいと思いました。スーパーで、菜飯用のが売っていたのですが、葉っぱのついたカブも安く売っていたので、カブの葉っぱも大根の葉っぱに似ているだろうと期待して、カブを買いました。


Just as I expected, turnip greens nukazuke was quite similar to daikon greens nukazuke.
This morning, I had some with natto (by adding some to the natto and mixing well).
期待通り、カブの葉っぱのぬか漬けは大根の葉っぱのぬか漬けとよく似ていました。
今朝は、納豆と一緒に食べました(納豆に入れて、良く混ぜて)。


DELICIOUS!!!
美味しかったです!

June 28, 2012

Katsu Sando (Cutlet Sandwiches)/カツサンド

The day before yesterday, I made tonkatsu for supper.
一昨日は夕飯に豚カツを作りました。

I used a pork thigh block of about 400 g.
400 gの豚ももブロックを使いました。


I also used thinly sliced pork.
豚の薄切りも使いました。


Simply rolled.  At first, I thought about rolling with shiso leaves and umeboshi paste, but I gave up the idea.
単に巻いただけです。最初はシソと梅干ペーストと一緒に巻こうと思ったのですが、止めました。

Thus, I made 21 normal katsu and 11 katsu rolls.
というわけで、普通のカツを21枚、巻いたカツを11個作りました。


Yesterday morning, I used two of the leftover katsu in my son's bento.
昨日の朝は、残ったカツのうち2枚を息子の弁当に入れました。


Tare katsu bento!
たれカツ弁当です!

And, for lunch yesterday, I made a katsu sando (sandwich), using three katsu.
そして昨日の昼ご飯には、カツを3枚使って、カツサンドを作りました。


Leftover shredded cabbage, chuunou sauce, Japanese mustard, and lemon juice.
残りのキャベツの千切り、中濃ソース、芥子(からし)、レモン果汁。


It was delicious!
美味しかったです。

June 24, 2012

My Nukadoko on June 24, 2012/私のぬか床、2012年6月24日


I put my nukadoko in the freezer on December 28, 2011, as I described here, and yesterday, I took it out of the freezer.
ここで述べたように、私はぬか床を20111228日に冷凍庫に入れましたが、昨日、冷凍庫から出しました。
I thawed it to room temperature, and then I buried two cucumbers in it.
室温で解凍してから、きゅうりを二本、埋めました。
About 20 hours later, I thought that the cucumbers were fully pickled.
20時間後、きゅうりは完全に漬かっていると思いました。
They were.
漬かっていました。
I added another 100 g rice bran plus 7 g salt to my nukadoko, and mixed well.
米ぬかをまた100 gと塩7 gをぬか床に足して、よく混ぜました。
I want to pickle daikon leaves!!!
大根の葉っぱを漬けたいです!

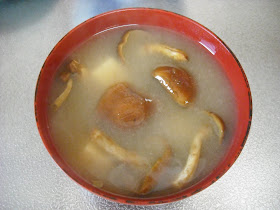
Okky Nameko/オッキーなめこ

Okky Nameko is one of my favorite mushrooms. It's a new type of nameko produced by Sugawara Reizou Co., Ltd. (Japanese only), located in Yamagata, using culture medium containing plant collagen. Obviously, its greatest feature is its size, and the manufacturer says even its stem tastes good. 
Note: I'm not sure how to spell オッキー in English. The spelling Okky is tentative. 
オッキーなめこは好きなきのこのひとつです。山形県にある菅原冷蔵株式会社が、植物性コラーゲンを含む培地を使って製造する新しいタイプのなめこです。見て分かる通り、最大の特徴はその大きさで、またメーカーでは、茎まで美味しいと言っています。 


The other day, I bought two packs. 
先日、2パック買いました。

I just put it in miso soup, together with diced silken tofu. 
さいの目に切った絹豆腐と一緒に味噌汁に入れました。 Edited to add a photo: 写真を追加: Before the advent of Okky Nameko, nameko this size was of large size. オッキーなめこが登場する前は、このサイズのなめこが大きいサイズでした。

June 20, 2012

Cornbread/コーンブレッド


My cornbread is more like hoe cake or Johnnycake than cornbread.
I wanted to buy some cornmeal, but the imported food shop didn't carry it, so I bought some corn grits.

400 g (600 ml) corn grits (or cornmeal)
600 ml milk
2 eggs
1 tsp salt
1 tsp baking powder
Note that my recipe does not call for sugar or flour.

Mix them all in a mixing bowl.  The resulting mixture is very runny.

私のコーンブレッドは、コーンブレッドと言うより、ホーケーキ、ジョニーケーキのようなものです。

コーンミールを買いたかったのですが、輸入食品の店になかったので、コーングリッツを買いました。

コーングリッツ(コーンミール) 400 g (600 ml)
牛乳 600 ml
卵 2個
塩 小さじ1
ベーキングパウダー 小さじ1
注: 私のレシピには砂糖も小麦粉も入っていません。

全てボールに入れ、混ぜます。とても水っぽい状態です。
I used two 18-cm frying pans.  I first put a very small amount of oil in each pan, and then poured three ladleful of the mixture to each pan, and put on the lid.  The heat must be very low.
18センチのフライパンを2つ使いました。まず、油をごく少量、各フライパンに入れ、コーングリッツや牛乳を混ぜた物をお玉に三杯分入れて、蓋をしました。火はごく弱火にします。
Flip over in about 3 minutes.  To do so, I used a plate:  Slide onto the plate, and return to the frying pan, with the top side down.
約3分後、ひっくり返します。私はお皿を使いました。すべらせてお皿に乗せ、上部を下にして、フライパンに戻します。
Et voila!
こうなります。
Put on the lid, and heat for another 2-3 min. until done.
蓋をして、もう2、3分、火が通るまで加熱します。
About 1 cm thick.
厚さは1 cm程度です。 
I made four of them in total.
全部で4枚作りました。

If you are interested to know authentic Southern style cornbread, I recommend visiting this thread on eGullet.
本格的な南部風のコーンブレッドについて知りたければ、eGulletのこの
スレッドをお薦めします。

June 18, 2012

Jasmine Rice, etc/ジャスミンライスなど


Last Friday, I took a trip to Nagaoka to attend a parents meeting at my son's high school in the afternoon.  I took a 6:46 train to spend the whole morning visiting the Yamamoto Isoroku Memorial Hall and other interesting places.  After attending the meeting, I dropped by an imported food shop and bought these:
この前の金曜日には、午後、息子の高校の保護者会に出席するため、長岡に行きました。6:46の電車に乗って、午前中は山本五十六記念館など興味深い場所に行って来ました.保護者会の後、輸入食品の店に行って、こんなものを買いました。

Corn grits, apricot jam from Switzerland, and Jasmine rice.
コーングリッツ、スイスのアンズジャム、ジャスミンライス。


Today, I made "dry curry" for supper and had it with Jasmine rice.
今日は、夕飯にドライカレーを作ってジャスミンライスと一緒に食べました。

Believe it or not, this is the first imported rice all my family have ever had in our lives.
信じられないかも知れませんが、家族全員、輸入米を食べるのは初めてです。

Follow-Up on My Ume Drink/梅ジュースのフォローアップ


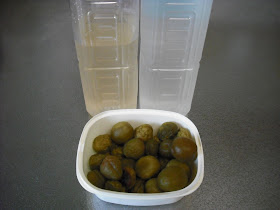
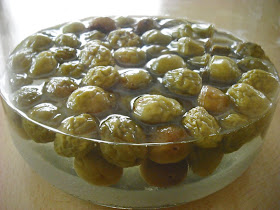
On June 16, I finally transferred the syrup to a PET bottle and the ume in two containers.
I diluted some syrup with four times the amount of water, and this time, the resultant drink satisfied me.  A good balance of sweetness and sourness.  The ume taste good, too.
6月16日、シロップはPETボトルに移し、梅は2つの容器に移しました。
シロップを4倍の水で薄めて飲みましたが、今度は、満足できました。甘さと酸っぱさのバランスがいいです。梅も美味しいです。

Syrup in a PET bottle on the left, and diluted syrup in a bottle on the right.
左はPETボトルに入れたシロップ、右は薄めたシロップ。


June 13, 2012

Ume Jam/梅ジャム


Ingredients:
1 kg ao ume (unripe ume)
800 g sugar
70-90% of the ume by weight

Equipment:
Enameled pot

Directions:
1.  Wash ume, and remove the "heta" (calyx) from each ume.
2.  Soak ume in cold water for a few hours, overnight, or up to 24 hours, depending on the amount of "aku" (harshness) in them.
3.  Put ume in enameled pot, add water, bring to a boil, simmer for a few minutes until soft, and drain.
4.  Remove stone from each ume.  Strain if required.
5.  Put flesh in enameled pot, add half sugar, turn on the heat, and simmer for about 5 min., stirring constantly and skimming foam.
6.  Add remaining sugar, and simmer again, constantly stirring, until the desired texture is obtained.
材料:
青梅 1 kg
砂糖 800 g
梅の重さの7~9割

器具:
ホーロー(ホウロウ、ほうろう、琺瑯)鍋

作り方:
1.  梅を洗い、「へた」を取る。
2.  アクの量により、数時間、一晩、24時間、冷水に漬ける。
3.  ホーロー鍋に入れ、水を入れ、沸騰させ、柔らかくなるまで煮て、水を切る。
4.  種を取る。必要に応じて裏ごしする。
5.  果肉をホーロー鍋に入れ、砂糖を半分入れ、火を点け、常にかき混ぜ、アクを取りながら、5分程度煮る。。
6.  残りの砂糖を加え、常にかき混ぜながら、適度な柔らかさになるまで煮る。

I soaked the ume for only 1 hour, and put in the freezer (because I initially planned to make ume drink with them.)
梅は1時間だけ漬けて、冷凍庫に入れました(最初は、梅ジュースを作ろうと思っていたので)。
Ume in an enameled pot:
ホウロウ鍋に入れた梅:


Despite the recipe above, I turned off the heat before the pot came to a boil, and let sit for a few minutes.
上記のレシピに反して、鍋が沸騰する前に火を止め、数分間そのままにしました。


Then, I drained.
それから、水を切りました。


I didn't remove the stones from ume.
梅の種を取りませんでした。


Within ten minutes or so, the ume looked OK.  Despite the recipe, I used only 600 g sugar after all.
10分程度で、良さそうな状態になりました。レシピと異なり、結局、砂糖は600 gしか使いませんでした。


"Looks delicious!", I thought.
「美味しそう!」と思いました。


I was wrong.  I found the resultant ume jam was quite bitter.
間違ってました。できた梅ジャムはかなり苦かったです。

I searched for solutions, and found one:  Return to pot and add an equal amount of water, and simmer again, while skimming foam.  I tried the solution a few days later.
解決方法を探し、見つけました:鍋に戻し、同量の水を加え、アクを取りながら、煮直す。数日後、この方法を試しました。

I also removed stones from the jam while skimming foam.
アクを取りながら、種も取りました。
I failed to reduce the jam to the original amount (because I was not patient enough), but somehow managed to reduce the bitterness to some degree.
元の量まで減らせませんでしたが(我慢が足りないので)、どうにか苦味を或る程度減らすことができました。

I had yogurt with some of the watery jam.
この水っぽいジャムでヨーグルトを食べました。
Not bad.  The next time I make ume jam, I will be more careful!
悪くないです。今度梅ジャムを作る時は、もっと注意します!


I forgot to mention that I added additional 200 g sugar in an attempt to offset the bitterness.
I have already asked my father to send some ripe ume next year (and this year, too, if possible), so I can make ume jam with ripe ume.
苦味を和らげるため砂糖を200 g足しました。
来年は(できれば今年も)熟した梅で送ってくれるよう頼みました。熟した梅で梅ジャムを作ろうと思います。


June 12, 2012

Ume Drink/梅ジュース


Note:  In Japan, this drink is called ume juice or ume syrup.  In Japanese, the word juice is used to mean any non-alcoholic drink.  To mean fruit extract, the more accurate word kajuu is used.

Ingredients:
1 kg ao ume, literally blue ume but actually green ume, i.e., unripe ume
800 g to 1 kg sugar
(I used 1 kg shiro zatou, the most common type of sugar in Japan.  Some recipes recommend using rock sugar.)

Equipment:
Glass jar with a capacity of 3 liters or greater

You will need alcohol to sterilize the jar.

注: 日本では、この飲み物は梅ジュースとか梅シロップと呼ばれています。日本語では、アルコールの入っていない飲み物なら何でも「ジュース」と呼ばれます。果物から採った汁を指すには、もっと正確な「果汁」という言葉を使います。

材料:
青梅 1 kg。青梅とは、実際は緑色の梅、つまり、未熟の梅のことです。
砂糖 800 g1 kg
(私は、日本では最も一般的な白砂糖を1 kg使いました。氷砂糖を薦めるレシピーもあります。)

器具:
容量3リットル以上のガラス瓶

ガラス瓶を殺菌するのにアルコールが必要です。

Directions:
1.  Wash ume and soak in cold water for a few hours.
(I soaked mine for 1 hour.  Some recipes do not say to soak ume.)
2.  Remove "heta" (calyx) from each ume, with a toothpick or something similar.
3.  Dry each ume, using dry cloth.
4.  Put all ume in a plastic bag, and put in the freezer overnight.
(Some recipes recommend not freezing ume.)
5.  Wash jar, and sterilize the inside with alcohol.
6.  Put some sugar in jar first, then some ume.  Repeat this step, making sure that you top it with sugar.
Correction:  Put some ume in jar first, then some sugar.
7.  Leave jar in a cool, dark place, with some newspaper beneath it.
8.  Shake jar once or twice a day.

Ume drink will be made in one week to ten days.
To drink, dilute with four to five times the amount of water.

Some recipes recommend sterilizing ume drink at 80C for 10 to 15 minutes before storage.
作り方:
1.  梅を洗い、水に数時間漬けます。
(私は1時間漬けました。梅を漬けないレシピもあります。)
2.  楊枝などで、梅から「へた」を取ります。
3.  乾いた布で、梅を拭きます。
4.  梅を全部、ビニール袋に入れ、冷凍庫に一晩置きます。
(梅を凍らせないほうがいいと言うレシピもあります。)
5.  瓶を洗い、内側をアルコールで消毒します。
6.  最初に、瓶に砂糖を少し入れ、次に梅を少し入れます。これを繰り返します。最後には上部に砂糖が来るようにします。
訂正:最初に、瓶に梅を少し入れ、次に砂糖を少し入れます。
7.  下に新聞紙を敷いて、瓶を冷暗所に置きます。
8.  瓶を毎日1~2回、振ります。

梅ジュースは1週間~10日でできます。
飲むには、4~5倍の水で薄めます。

80C1015分間、殺菌してから保存することを薦めるレシピもあります。

This is the "heta" of an ume.
これが梅の「へた」です。
It's rather time-consuming to remove the heta from each and every ume.
梅一つ一つのへたを取るのはちょっと時間がかかります。

Obviously, my jar was way too big for 1 kg ume.
見て分かるように、この瓶は1 kgの梅には大き過ぎました。

Ten days have passed.
十日(とうか)が過ぎました。
Almost all ume are now wrinkled up.
梅は殆ど、しわくちゃだらけです。
I had one glass.
一杯飲みました。
I was a little disappointed by the flavor.  I had thought it would be more sour.
味には少しがっかりしました。もう少し酸っぱいだろうと思っていたので。

Some recipes recommend using the used ume to make ume jam.  I tasted the ume, and decided not to.  Not much flavor left.
使った梅を使って梅ジャムを作ることを薦めるレシピもありますが、食べてみて、諦めました。あまり風味が残っていないので。

June 11, 2012

Eryngii Gratin/エリンギグラタン


I know I have posted about my gratin a number of times before, but the recent discussion about carb and carb combinations has made me want to post about my gratin one more time.

In Japan, a gratin usually contains macaroni, and I used to make a gratin in a usual way, but one day, I thought a carb and carb (macaroni and rice) combination was too much for me, and made a macaroni-less gratin.  I liked it because the gratin was much less heavy, and was suitable for an okazu for rice.  Now I usually make a macaroni-less gratin.

私のグラタンについては何回も書いていますが、最近、炭水化物同士の組み合わせについて話し合ったせいで、また私のグラタンについて書きたくなりました。

日本では、グラタンには普通、マカロニが入っていて、私も普通にグラタンを作っていましたが、ある日、炭水化物同士(マカロニとご飯)の組み合わせは、きついと思ったので、マカロニなしのグラタンを作りました。重くなくて、ご飯のおかずには合っているので、好きになりました。今では、普通、マカロニなしのグラタンを作っています。

材料:
玉ねぎ 1個
エリンギ 1パック
鶏の腿肉 1つ
塩 小さじ1/2
小麦粉 大さじ4
牛乳 1カップ(200 ml
ナチュラルチーズ
パン粉


Pan-fry onion, eryingii, and chicken thigh, turn off the heat, sprinkle flour, mix well, add milk, turn on the heat again, and mix well for a few minutes until milk thickens.
玉ねぎ、エリンギ、鶏の腿肉を炒めて、火を止め、小麦粉を振り掛け、よく混ぜ、牛乳を入れ、火をまた点けて、数分、牛乳にとろみがつくまでよく混ぜる。

I transferred half of the ingredients to a tray with parchment paper on it, sprinkled cheese and panko, and grilled in to toaster oven for about 5 min.
材料の半分を、クッキングシートを敷いたトレイに移し、チーズとパン粉を振り掛け、オーブントースターで約5分焼きました。

June 6, 2012

Potato Salad Sandwiches/ポテトサラダサンド


For lunch today, I made potato salad sandwiches, using leftover potato salad.
今日の昼ご飯には、残りのポテトサラダでポテトサラダサンドを作りました。
In Japan, potato salad sandwiches are very popular, and I personally like them very much.  When I make potato salad, I often make a lot of it, so that I can make potato salad sandwiches for lunch the next day.
日本では、ポテトサラダサンドはとても一般的で、私自身も大好きです。ポテトサラダを作る時は、翌日、昼ごはんにポテトサラダサンドを作れるよう、いっぱい作ることが多いです。
Although not visible in the photo, I placed one slice of ham on top of each slice of bread.  I usually leave out butter or margarine.  As shown in the photo, I sometimes pour some tonkatsu or chuunou sauce.
写真では見えませんが、それぞれのパンの上にはハムを一枚乗せました。私は普通、バターやマーガリンは省略します。写真の通り、豚カツソースか中濃ソースをかける時もあります。

June 5, 2012

Daikon no Niku Maki/大根の肉巻き


I made daikon no niku maki (daikon wrapped in meat) as part of supper tonight.  As I previously mentioned, the word niku (meat) usually means pork in Kanto (Eastern Japan), while it usually means beef in Kansai (Western Japan).
今日の夕飯には、大根の肉巻きを作りました。前にも言ったように、肉とは関東では普通、豚肉を指し、関西では牛肉を指します。

1. Cut daikon into rectangles each measuring about 5 x 1 x 0.5 cm, sprinkle with salt, and let sit for 5 min.
2. Cut thinly sliced pork in half (each measuring about 15 cm in length) and wrap each daikon rectangle.
3. Place each daikon wrapped in meat in a frying pan, with the meat end side down, turn on the heat, and put on the lid.  No oil is necessary.
1. 大根は5 x 1 x 0.5 cm程度の長方形に切り、塩を振り、5分おいておく。
2. 豚の薄切りを半分に切り(それぞれ長さ15 cm程度)、大根を巻く。
3. 肉で巻いた大根を、肉の端がある側を下にして、フライパンに入れ、火を点け、蓋をする。油は要りません。
4. When the upper part of each daikon is done, turn over, and put on the lid to heat the other side.
4. 大根の上の部分に火が通ったら、ひっくり返して、蓋をして、反対側を焼く。
5. Mix 30 ml each of mirin, soy sauce, and sake, and add to the frying pan.
5. みりん、しょう油、お酒をそれぞれ30 ml混ぜて、フライパンに入れる。
After I transferred the daikon to a plate, I had to cook the unused daikon rectangles by first microwaving for 2 min. and then simmering in the frying pan.
大根をお皿に移してから、残った大根をまず電子レンジで2分加熱し、それからフライパンで煮ました。

I later sprinkled some white sesame seeds.
後で白ゴマを少し振りました。

I think I'll include some of them in the bento for my son tomorrow.
明日、息子の弁当に少し入れようと思います。