January 28, 2014

黄金ガレイの煮付け/Simmered Yellow Sole

As part of supper tonight, I made kogane garei no nitsuke (simmered yellow sole).
今日の夕飯には黄金(こがね)ガレイの煮付けを作りました。
 
I used this junmai hon mirin.
この純米本みりんを使いました。
The raw ingredients are mochi rice (produced in Thailand), rice malt (made from rice produced in Thailand), and brewer's alcohol.
原材料は、もち米(タイ産)、米こうじ(タイ産米)、醸造アルコールです。 
I previously made men tsuyu (noodle soup) using this junmai hon mirin, and found the men tsuyu was slightly better than my usual version, made with mirin-fu chomiryo (mirin-like seasoning).
前にこの純米本みりんを使って麺つゆを作り、私のいつもの、みりん風調味料で作ったものより少しは美味しいと思いました。
 
The water + sake, mirin, and soy sauce ratio was 5:1:1.
Thus, I used
100 ml water + sake
20 ml mirin
20 ml soy sauce 
水+酒、みりん、しょう油の割合は5:1:1。
よって、
水+酒 100 ml
みりん 20 ml
しょう油 20 ml
使いました。
 
I simply rinsed each fillet with running water, made an x cut in the middle, and put in a large frying pan.
切り身をそれぞれ流水で洗って、真ん中にX字の切り込みを入れ、大きなフライパンに入れました。 
 
Shimofuri (frosting) is a common step, but I omitted it. (I once did shimofuri, but I didn't like the resulant flavor; I thought that shimofuri made the fish bland.) I added the seasonings mentioned above, brought to a boil, placed two sheets of paper towel in place of an otoshi buta, and simmered for less than 10 minutes until done.
霜降りが一般的ですが、私は省略しました(以前に霜降りをしたことがあるのですが、味が気に入りませんでした。霜降りをしたせいで、魚が味気なくなったと思いました)。上記の調味料を入れ、沸騰させ、落し蓋の代わりにキッチンペーパーを2枚載せ、火が通るまで10分未満煮ました。
 
If you like yours on the sweet side, add some sugar.
甘くしたければ、砂糖を少し足して下さい。
 

January 27, 2014

Okonomiyaki with Yamato Imo in It/大和芋入りのお好み焼き

Late last year, my father sent us this yamato imo together with other foodstuffs.
去年末、父からこの大和芋(やまといも、ヤマトイモ)や他の食材をもらいました。
My father said he got some yamato imo from an acquaintance. Yamato imo is a type of yama imo (lit. "mountain potato", yam). I've never seen yamato imo of such a strange shape.
Images of yamato imo
知り合いから大和芋をもらったそうです。大和芋は山芋の一種です。こんな奇妙な形のヤマトイモを見るのは初めてです。
 
We used it to make tororo soba first, and then mugi toro.
まずはとろろそばに、次に麦とろに使いました。

And, as part of supper last night, I used the rest of the yamato imo to make okonomiyaki.
そして、昨日の夕飯に、残りのヤマトイモを使ってお好み焼きを作りました。
 
About 500 g.
約500 gです。

I don't like to peel the yamato imo because the skin is not thick and the part just below the skin is the most delicious part, but I peeled most of the skin because it was very soily, even after I scrubbed it with a tawashi.
大和芋の皮は薄く、また皮のすぐ下の部分が最も美味しい部分なので、皮を剥くのは嫌いなのですが、束子(たわし)でこすっても泥がついているので、皮は大部分剥きました。 
I added 600 g cabbage, and checked the texture. Then, I decided to add:
100 g flour
1 tbsp baking powder
200 ml milk
1 pack of sakura ebi (dried small shrimp)
キャベツを600 g入れ、柔らかさをチェックしました。 そして、次のものを入れることにしました:
小麦粉100 g
ベーキングパウダー 大さじ1
牛乳 200 ml
桜えび 1パック
I made four okonomiyaki in total, using two 18-cm diameter frying pan.
直径18 cmのフライパンを2つ使って、お好み焼きを全部で4枚作りました。 
My trick for flipping over using a plate worked fine, even though the dough is very soft because of the addition of yamato imo.
大和芋を入れたため、生地はとても柔らかいですが、私の、お皿を使ってひっくり返す技はうまく行きました。  
 
We also had leftover tonjiru (pork soup) and some other leftovers.
残りの豚汁や他の残り物も食べました。 
I also boiled some natsumikan peels. They are now in the fridge. I will simmer them with sugar later.
夏みかんの皮も茹でました。冷蔵庫にしまってあります。後で砂糖で煮ます。  
I almost forgot to upload this photo:
この写真をアップするのを忘れてました:
As always, my okonomiyaki is moyo-less.
いつも通り、私のお好み焼きは、マヨ抜きです。

January 19, 2014

A Practical Guide on Making a Coffee Roaster/コーヒー焙煎機を作るための実践的ガイド

First of all, here is an overview of my three coffee roasters.
まずは、私が持っている3種類のコーヒー焙煎機の概説です。
 
1. Milk can roaster
Bottom diameter: 13 cm
Height: 18 cm
Recommended amount of coffee beans to roast at a time/maximum capacity: 150/200 g
Features: With its appropriate number of holes with an appropriate size on the bottom, this roaster is designed so that first crack occurs in 12-14 minutes after the start of roasting when used with a 2,500 kcal/h portable gas burner (set to high right from the beginning).
Because of its great height, exhaust air control is "automatic".
Suitable for beginners.
1. ミルク缶焙煎機
底面の直径:13 cm
高さ:18 cm
一度に焙煎するコーヒー豆の量、推奨/最大:150/200 g
特徴:底面に適切なサイズの穴が適切な数だけ開いており、2,500 kcal/hのカセットコンロ(最初から「強」にセット)を使えば、焙煎後12~14分後に1はぜが起きるように設計されている。
高さがあるため、排気コントロールは「自動」。
初心者向き。
 
Six, twelve, and twelve holes on the circumferences of 2, 4, 5.5 cm radius circles.
The diameter of each hold is about 3 mm.
半径2、4、5.5 cmの円周上に穴が6、12、12個。
それぞれの穴の直径は約3 mm。
One big drawback is that it tends to escape the flame when you shake it up and down.
大きな欠点の一つは、上下に振る時に炎が逃げる傾向にあることです。 
 
2. Kettle roaster
Bottom diameter: 19.5 cm
Height: 9 cm
Recommended amount of coffee beans to roast at a time/maximum capacity: 200/250 g
Features: Because of its shape (narrow at top), keeps the heat in, so that it tends to roast coffee in a short period of time.
(First crack occurs 9 minutes after the start of roasting no matter how I try to control the heat.)
No need to place the lid.
Should be ideal for those who prefer dark roast coffee.
2. やかん焙煎機
底面の直径:19.5 cm
高さ:9 cm
一度に焙煎するコーヒー豆の量、推奨/最大:200/250 g
特徴:その形状(上が狭い)のため、熱がこもり、焙煎が短時間になる傾向。
(どんなに火力を調整しても、焙煎開始9分後に1はぜが起きる。)
蓋をする必要は、なし。
深煎りのコーヒーが好きな人には理想的でしょう。
8, 16, 16, and 16 holes on the circumferences of 2, 4, 6, and 8 cm radius circles
半径2、4、6、8 cmの円周上に穴が8、16、16、16個 
The bottom covers the entire flame range.
底面は炎の範囲全体をカバーしています。 
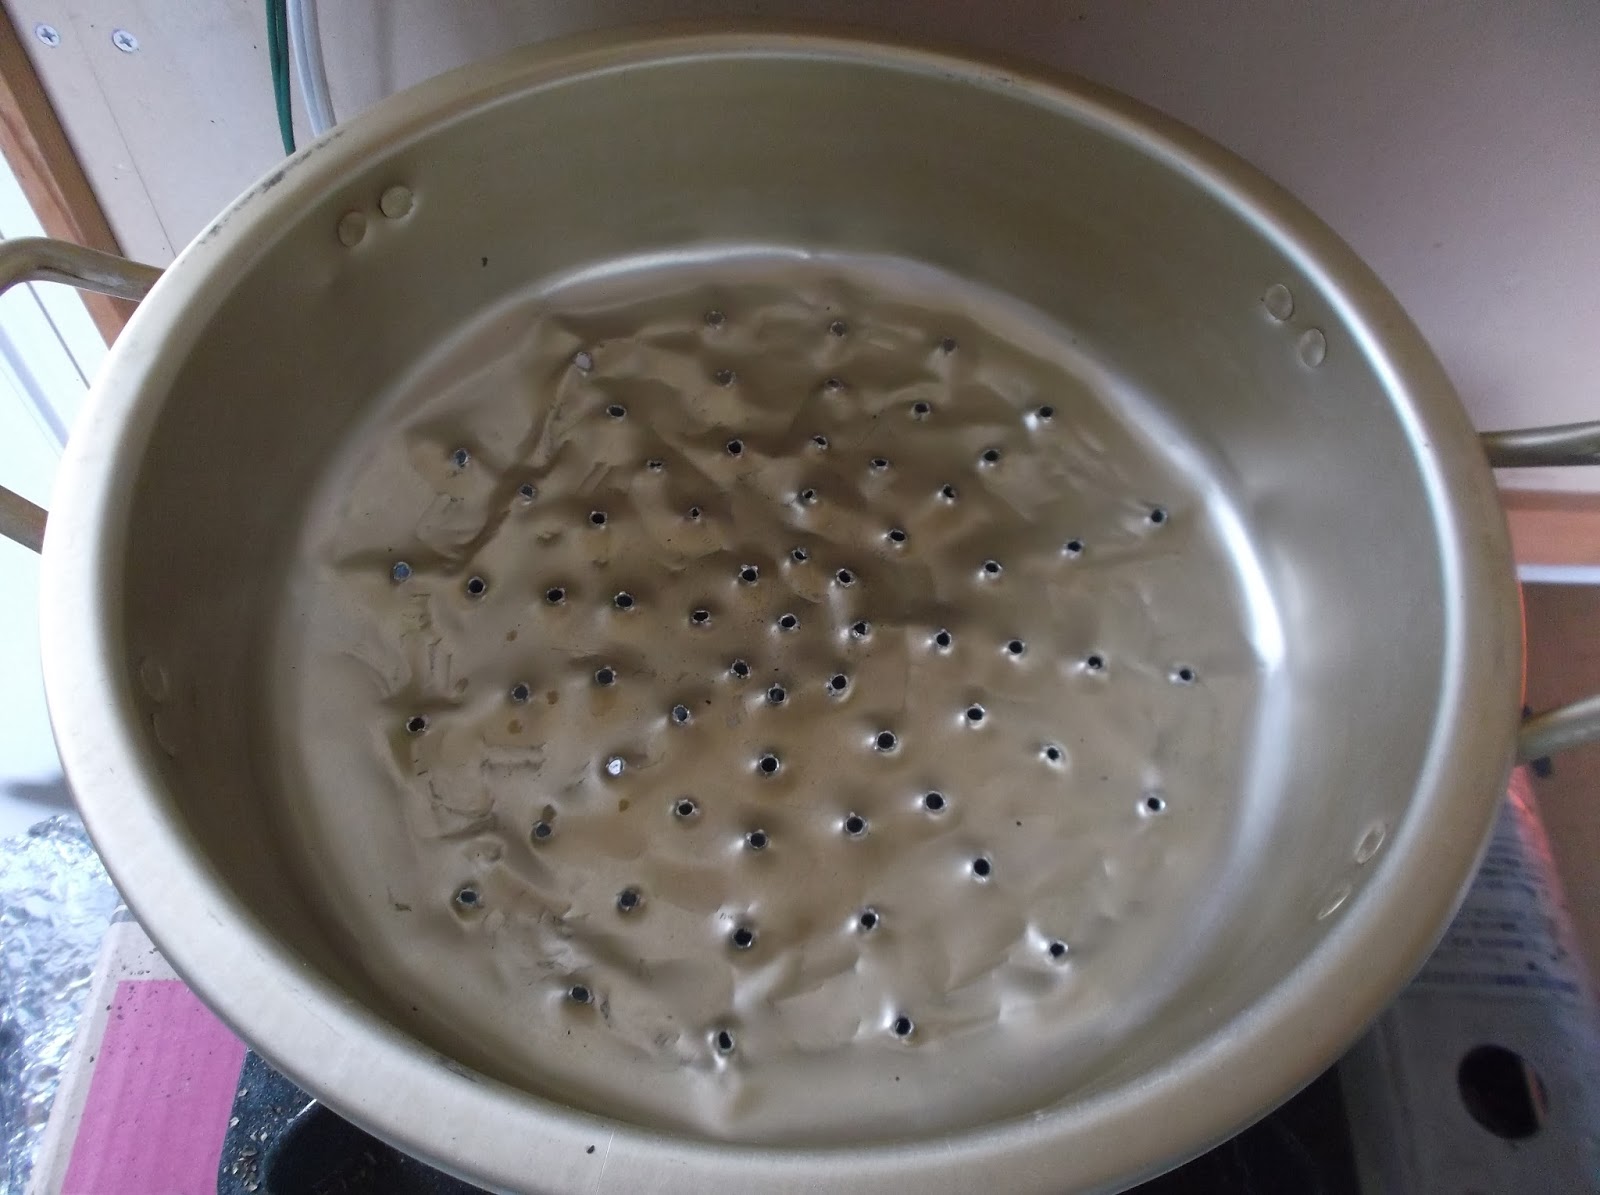
3. Shallow pot roaster
Bottom diameter: 24.5 cm
Height: 7 cm
Recommended amount of coffee beans to roast at a time/maximum capacity: 300/400 g
Features: For the initial ten minutes of roasting, you MUST cover the top with a lid or something similar (I use aluminum foil) to keep the humidity inside the pot high.
Unlike the two roasters above, you will shake it back and forth and sideways and move it in a circular motion to ensure even roasting.
3. 浅い鍋焙煎機
底面の直径:24.5 cm
高さ:7 cm
一度に焙煎するコーヒー豆の量、推奨/最大: 300/400 g
特徴: 焙煎の開始から最初の10分は、蓋など(私はアルミホイルを使ってます)で上部を覆い、鍋の内部の湿度を高く保つ必要があります。
上記の2つの焙煎機とは異なり、むらなく焙煎するには、前後左右に振ったり、円を描くように動かすことになります。
8, 16, 16, 16, and 16 holes on the circumferences of 2, 4, 6, 8, 10 cm radius circles
半径2、4、6、8、10 cmの円周上に穴が8、16、16、16、16個  
The bottom area is considerably larger than the flame range. That's why you have to shake the pot back and forth and sideways and move it in a circular motion.
底面の面積は、炎の範囲よりかなり大きいです。そのため、鍋を前後左右に振ったり、円を描くように動かす必要があります。
 
***
Now, based on the above description, you should be able to decide which type of coffee roaster you want to make. I personally recommend the third one because it can roast 300-400 g of coffee beans properly.
さて、これまでの説明で、どの種類のコーヒー焙煎機を作りたいか決められると思います。個人的には、3番目のがコーヒー豆を300~400 g焙煎できるので、お薦めします。

Lastly, from my experience, I wouldn't recommend a skillet, cast iron pot, or other heavy pot. For such pots, you can't make holes on the bottom with nails, you can't control the heat at will because of their high heat capacity, and you can't shake a heavy pot continuously for 14-16 minutes.
最後に、自分自身の経験から、フライパン、鉄鍋など重い鍋は薦めません。そういう鍋だと、釘で底に穴を開けられないし、熱容量が高いので、火力を自由に調節できないし、14~16分も振り続けられないからです。

To be continued. The next post will be a summary of direct flame roasting.
続く。次の記事は直火焙煎のまとめです。
 

January 18, 2014

Direct-Flame Coffee Roasting with a "Perforated" Pot/穴の開いた鍋による直火コーヒー焙煎

Note: The following description applies to direct-flame not hot air coffee roasting.
注:下記の記述は直火(熱風ではなく)コーヒー焙煎に当てはまることです。
 
First of all, let me show you my ideal coffee roaster No. 1.
まずは、私が理想とするコーヒー焙煎機一号機を見て下さい。
I have attached a piece of bamboo as a handle to facilitate shaking.
簡単に振れるよう、柄として竹を付けました。

This time, I decided to test whether it could roast 400 g of coffee beans evenly.
今回は、コーヒー豆400 gをムラなく焙煎できるか試すことにしました。 
You have to place a lid or something similar on the top for the first 10 minutes of roasting to keep the moisture inside the pot high.
This time, I decided to cover about 3/4 of the top.
焙煎の最初の10分間は、上部に蓋などをして、鍋の内部の湿度を高く保つ必要があります。
今回は、上部の約3/4を覆うことにしました。 
Note: As for the milk can roaster, you need not cover the top, because of its great height. A great feature of the milk can roaster is that you don't have to worry about exhaust air control.
注: ミルク缶焙煎機の場合は、高さがあるので、上部を覆う必要はありません。ミルク缶焙煎機の偉大な特徴の一つは、排気のコントロールを心配する必要がないことです。

Start roasting with the heat set to medium or high, depending on the heating power of the burner. If your burner has a heating power of 2,600 kcal/h or greater, you may want to start with medium. I started with the heat set to high because of the large amount of coffee beans.
Make sure that chaff starts to come off in about 3-4 minutes. If earlier, you need to lower the heat.
It is very important to keep in mind that coffee roasting is a two-phase process, drying phase and chemical reaction phase.
I first thought that I'd dry the beans for 12 minutes, but first crack occurred at around 11:45, so I changed my mind and removed the lid. Then, I took this photo and replaced the gas cylinder with a new one.
コンロの火力によりますが、火を中か強にして焙煎を始めます。火力が2,600 kcal/h以上のコンロであれば、中火で始めたほうがいいと思います。私は、コーヒー豆の量が多いので、火を強にして始めました。
極めて重要な留意点は、コーヒーの焙煎は2段階の工程であることです。乾燥段階と化学反応段階です。
最初は12分間、豆を乾燥させようと思っていたのですが、1ハゼが11:45に起きたので、考えを変え、蓋を取りました。この写真を撮って、ガスボンベを新しいのに交換しました。
Also, keep in mind that first crack should occur at 12-14 minutes after the start of roasting.
また、1ハゼは焙煎開始後12~14分後にすべきだということにも留意して下さい。

First crack continues for about 1-2 minutes. At this point, the beans lose weight by about 15%. When you bring them to second crack, they will lose weight by up to 20%.
1ハゼは1~2分続きます。この時点で、豆は15%程度重さが減ります。2ハゼまで持っていくと、20%まで重さが減ります。

When you have roasted your beans to the desired level, cool them immediately. I have an electric fan (not shown).
豆を好みのレベルまで焙煎したら、すぐに冷やして下さい。私は電気扇風機(写真には写ってません)を持っています。

I roasted my beans for a total of about 16 minutes.
I got 325 g of roasted beans.
合わせて16分程度焙煎しました。
焙煎した豆が325 gできました。
18.8% weight reduction.
重さの減った割合は18.8%。

Look at all the chaff generated during roasting:
焙煎中に出たチャフを見て下さい: 
I'm really glad that my pot roaster can roast 400 g of coffee beans properly.
私の鍋焙煎機はコーヒー豆400 gをちゃんと焙煎できて、うれしいです。

But, I have a new mission!
Yesterday, I found this great toaster oven sold for 500 yen at the second-hand store. Of course, I grabbed it!
しかし、私には新たなミッションが!
昨日、リサイクルショップでこのすごいオーブントースターが500円で売っていました。もちろん、すぐ買いました!
Two heating elements at the top and one at the bottom.
ヒータは上に2つ、下に1つ。 
It has a temperature control!
温度調節もあります! 
I think I'll convert this toaster oven into a coffee roaster.
このオーブントースターをコーヒー焙煎機にしようと思います。 

To be continuted. I haven't yet talked about the features of my three roasters (milk can, kettle, and alumite pot roasters).
続く。私の3種類の焙煎機(ミルク缶焙煎機、やかん焙煎機、アルマイト焙煎機)の特徴について、まだ話してません。

January 16, 2014

Everyday life in bygone days in Tokyo, 1966

Just wanted to share this video:
http://www.youtube.com/watch?v=qvoZjbp9R1w
I was six years old then, and lived in Shibuya, Tokyo. The video brings me back a lot of memories.

January 11, 2014

An Ideal Coffee Roaster for Me/私には理想的なコーヒー焙煎機

I previously used a 26-cm diameter shallow, alumite pot to try to roast 200 g of coffee beans, but I failed, as I described here. After much thought, I decided to give the pot another try, but this time after making some holes at the bottom.
ここに書いた通り、以前、直径26 cmの浅いアルマイト鍋を使って、コーヒー豆を200 g焙煎しようとしましたが、失敗しました。いろいろ考えた結果、その鍋をもう一度試すことにしました。今回は底に穴を開けてからです。
    
 
300 g (not 200 g) of Brazilian coffee beans:
コーヒー豆(ブラジル)、300 g(200 gではなく): 
For the first 10 minutes, I placed this semicircular lid on the top.
最初の10分は、この半円形のふたを上に置きました。 
After 15.5 min. roasting:
15.5分間の焙煎後:  
The beans are now 250 g in weight.
豆は重さ250 gになりました。 
16.7% weight reduction. Sounds perfect!
重さは16.7%減りました。完璧です!
 
I know I need to refine my pot roaster slightly so that I can shake it more easily, but I'm pretty sure this is going to be an ideal coffee roaster for me.
この鍋焙煎機をもっと簡単に振れるよう少し改良する必要がありますが、私にとっては理想的なコーヒー焙煎機になるだろうと確信しています。

January 4, 2014

Washoku, traditional dietary cultures of the Japanese, notably for the celebration of New Year/和食;日本人の伝統的な食文化-正月を例として-

In December last year, Washoku was added to UNESCO's Intangible Cultural Heritage list. It's very important to note that Washoku as the traditional dietary cultures of the Japanese has been recognized as a cultural asset, not any particular Japanese foods or dishes.

去年12月、和食がユネスコの無形文化遺産に登録されました。とても重要なことは、或る特定の日本の食品や料理ではなく、日本人の伝統的な食文化としての和食が文化遺産と認められたことです。

The Nomination file no. 00869 for inscription in 2013 on the Representative List of the Intangible Cultural Heritage of Humanity summarizes WASHOKU as follows:
WASHOKU is social practice based on a comprehensive set of skills, knowledge, practice and traditions related to the production, processing, preparation and consumption of food.

「無形文化遺産の代表的な一覧表への記載についての提案書」(農林水産省作成仮訳)では、和食を次のように要約しています。
「和食」は食の生産から加工、準備及び消費に至るまでの技能や知識、実践や伝統に係る包括的な社会的慣習である。

According to the leaflet introducing WASHOKU, published by the Government of Japan, WASHOKU has these four features:
Various fresh ingredients and using their natural tastes
Well-balanced and healthy diets
Emphasis of the beauty of nature in the presentation
Connecting to annual events

(To view the leaflet, go to this site first and then click the Japanese text below the leaflet image.)

日本国が発行している和食を紹介するリーフレットによれば、和食には次の4つの特徴があるそうです。
多様で新鮮な食材と素材の味わいを活用
バランスがよく、健康的な食生活
自然の美しさを表現
年中行事との関わり

(リーフレットを見るには、まずこのサイトに行き、リーフレットの画像の下の和文をクリックして下さい。)

References/参考:
Washoku video on YouTube, uploaded by UNESCO/ユネスコがアップしたYouTube上の和食ビデオ
Washoku video on YouTube, uploaded by kanteijp (prime minister's office)/kanteijp(首相官邸)がアップしたYouTube上の和食ビデオ