January 11, 2010

Zosui from Leftover Kanpachi Daikon/カンパチ大根の残りで作った雑炊

This is what is left of the kanpachi daikon that I made two days ago.
二日前に作ったカンパチ大根の残りです。

The broth has turned gelatinous, as you can see from the photo below. Such gelatinous broth is called nikogori. Nikogori can also mean a dish made from such gelatinous broth.
次の写真で分かるように、汁はゼラチン質になっています。このようなゼラチン質の汁を煮凝り(にこごり)と言います。「煮凝り」はこのようなゼラチン質の汁から作った料理を指すこともあります。

I made zosui from the nikogori for supper tonight. Zosui is porridge or congee made from pre-cooked (leftover) rice. I simply added some leftover rice to the nikogori, brought to a boil, and added two beaten eggs.
今日の夕飯には、この煮凝りから雑炊を作りました。雑炊とは、既に炊いたご飯(残りご飯)で作るporridge、congeeのことです。ただ、煮凝りに残りご飯を入れ、沸騰させ、溶き卵を2つ入れただけです。

Top it with chopped ao negi (long green onion), if you can.
All my family loved it, except my daughter.
できれば、刻んだ青ネギを上に乗せます。
娘以外、全員気に入ってくれました。
We also had blowfish karaage:
ふぐの唐揚げも食べました。

I got buri ara today! I'm going to sprinkle it with salt and grill it!
今日はブリのアラを買いました!塩焼きにするつもりです!

Pickled Nozawana/野沢菜漬け

Can you guess what's in this large plastic container?
この大きなプラスチック容器に何が入っているか分かりますか?

When you open the lid, you will first see a weight and a plastic board (not visible in the photo) beneath it.
蓋を開けると、最初に重しとその下のプラスチックの板(写真では見えない)が見えます。

When you take them out, you will see this:
それらを取り出すと、これが見えます。

Pickled nozawana, well, a lot of it!
野沢菜漬けがいっぱい!

The pickled nozawana was given to us by BIL last November. It retained its original vivid green for some time, but it has now turned amber. It has turned sour, too. It's still good as tsukemono, and you can also remove some salt from it and use it for a variety of dishes.
この野沢菜漬けは去年の11月に義理の兄からもらったものです。しばらくはもともとの鮮やかな緑色でしたが、今では「べっこう色」になってしまいました。また酸っぱくなってしまいました。
まだ漬物としても美味しいし、少し塩抜きをして、色々な料理に使うこともできます。

I finely chopped some pickled nozawana, put it in a bowl full of water to remove some salt, and drained it. I like to mix it with natto.
野沢菜漬けを少し細かく切って、水の入ったボールに入れ、塩抜きし、水を切りました。私は納豆と混ぜるのが好きです。

January 10, 2010

Buta no Kakuni (Braised Pork Belly)/豚の角煮

Yesterday, I bought some pork belly, and I made buta no kakuni this morning to have it for supper.
昨日は豚バラを買いました。そして今朝、夕飯に食べるため、豚の角煮を作りました。

My recipe is adapted from one of my favorite cookbooks, Wariai de Oboeru Wa no Kihon (Basics of Japanese Cuisine You Can Learn with Ratios), written by Yoshihiro Murata.
His original recipe does not call for sake, ginger, negi (Japanese leek), or other ingredients that are usually considered necessary, and I expected that it would let the flavor of my pork belly shine through.
このレシピーは、私の好きな料理の本、村田吉弘著作の「割合で覚える和の基本」を少し変えたものです。
そのレシピーには日本酒、ショウガ、ネギなど通常必要とされる具材が書かれていないので、私は豚バラの風味が際立つのではないかと思いました。


My original recipe for buta no kakuni (braised pork belly), adapted from the cookbook above.

Ingredients:
600 g pork belly
4 boiled eggs
(I actually used eight because I really like boiled eggs seasoned in the broth.)
500 ml water
62.5 ml soy sauce
62.5 ml mirin
(Water, soy sauce, and mirin ratio = 8:1:1)
豚の角煮のレシピ(上述の料理の本のレシピーを少し変えた私のオリジナルレシピー)

材料:
豚バラ600 g
茹で卵4つ
(私は実際8つ使いました。味付け玉子が大好きなので。)
水500 ml
醤油62.5 ml
味醂62.5 ml
(水、醤油、味醂の割合=8:1:1)

Directions:
1. Cut pork belly in 8 equal parts.
2. Put them in a pan, skin side down. No oil is necessary. Cook all sides.
3. Transfer to a pot, add water, soy sauce, and mirin. Simmer for 50 min.
I added 8 boiled eggs later in the simmering process, and covered the ingredients with sheets of paper towel.
作り方:
1. 豚バラ肉を8つに等分します。
2. 皮を下にしてフライパンに入れます。油は必要ありません。すべての面を焼きます。
3. 鍋に移し、水、醤油、味醂を入れます。50分煮込みます。
煮込み中、後で茹で卵を8個入れ、キッチンペーパーで覆いました。


Serve with karashi (Japanese mustard).
カラシと一緒に出します。


The resultant buta no kakuni was good enough for me, but you may find it lightly seasoned, depending on your preferences. Quite frankly, I'm not a big fan of buta no kakuni, and I was more attracted to boiled eggs seasoned in the broth.
出来た豚の角煮は私は美味しいと思いましたが、好みによっては味付けが薄いと思うかもしれません。率直に言うと、味付け玉子のほうが私には魅力的です。

January 9, 2010

Kanpachi Daikon (Amberjack Simmered with Daikon)/カンパチ大根

Buri daikon (adult yellowtail simmered with daikon) is a very popular winter dish in Japan. I personally don't like the type of buri daikon served in restaurants because it is often overly sweet and salty.
Yesterday, I found packs of kanpachi (or kampachi) "ara" (trimmings) sold for 380 yen each at the supermarket I frequent, and I just had to buy one. I first thought that I would simply sprinkle with salt and grill, because I like grilled kanpachi kama so much, but then I changed my mind. I thought it might be a good idea to make kanpachi daikon the way I like it. As usual, I searched for recipes that sounded good, and I decided to use the water, soy sauce, and mirin ratio of 8:1:1 this time.
I'm not sure how to call kanpachi (or kampachi) in English. Wikipedia lists four:
amberjack
Purplish amberjack
Greater yellowtail
Ruderfish
Anyway, buri, kanpachi, and hiramasa are very similar to one another in appearance and flavor.

Kanpachi Daikon

Ingredients:
1 pack kanpachi ara
1/2 daikon
1 knob ginger, sliced
(I acutally used 2, because I like ginger.)
800 ml water
(First I put 800 ml water, but added another 100 ml later to cover the ara.)
100 ml sake
100 ml mirin
100 ml soy sauce

日本では、ぶり大根(ブリ大根)は冬にとても人気のある料理です。私自身は、店で出すようなぶり大根は甘じょっぱ過ぎて、好きではありません。
昨日、よく行くスーパーでカンパチのアラが1パック380円で売っていて、私は思わず買ってしまいました。最初はただ塩焼きにしようと思ったのですが(カンパチのカマの塩焼きが好きなので)、考えを変えて、カンパチ大根を自分なりに作るのも悪くないなあと思いました。いつもの通り、良さそうなレシピーを探し、今回は水、醤油、味醂の割合を8:1:1にすることにしました。
カンパチを英語で何と言うかよく分かりません。Wikipediaでは4つ挙げています。
amberjack
Purplish amberjack
Greater yellowtail
Ruderfish
ともかく、ブリ、カンパチ、ヒラマサは姿、味ともよく似ています。

カンパチ大根

材料
カンパチのアラ1パック
大根1/2
ショウガ ひとかけ
(ショウガは好きなので、実際は、ふたかけ使いました。)
水800 ml
(最初に水を800 ml入れましたが、後でアラがかぶるようもう100 ml足しました。)
日本酒100 ml
味醂100 ml
醤油100 ml soy sauce

Directions:
1. Peel daikon and cut into 2-cm rounds.
I used a peeler.

作り方:
1. 大根は皮をむいて、2 cmの輪切りにします。
私はピーラーを使いました。

If you want to be authentic, peel thickly, using an usuba or nakiri, to remove the hard outer skin, cut in thick (about 3-cm)slices, and chamfer the edges on both sides of each slice.
ちゃんとやりたければ、薄刃や菜切りを使って、皮を厚くむき、厚い(3 cmくらい)輪切りにして、それぞれの輪切りの両面の角を面取りします。

2. Cut kanpachi ara in large pieces, using a deba.
2. カンパチのアラを出刃を使って大きく切り分けます。

3. Boil some water in a pot, put the ara in it, and remove immediately.
3. 鍋でお湯を沸かせ、アラを入れ、すぐに取り出します。

4. Remove blood.
4. 血合いをとります。

5. First put daikon in a pot and then ara. Add sake and water to cover and ginger slices. Bring to a boil.
5. まずは鍋に大根を、次にアラを入れます。日本酒と水をかぶるだけ入れ、ショウガも入れます。沸騰させます。

6. Add mirin, and put a drop lid (otoshi buta). If you don't have one, substitute a sheet of aluminum foil or paper towel.
6. 味醂を入れ、落し蓋を乗せます。持っていなければ、アルミホイルやキッチンペーパーを使います。

7. Put on the lid and simmer for 5 min. Then, add soy sauce. Simmer for another 15 min.
7. 蓋をして、5分煮ます。醤油を入れます。さらに15分煮ます。

By the way, I used cooking sake, not drinking sake.
ところで、私は飲用の酒ではなく料理酒を使いました。
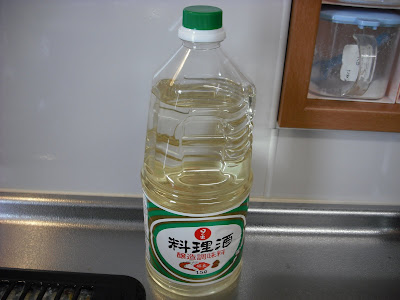
Note that cooking sake usually contains some salt to avoid liquor tax. Mine contains 2.1% salt.
料理酒には通常、酒税を逃れるため塩分が少し入っています。私のには2.1%入っています。

Almost done!
Note that the paper towel remained intact.
もうそろそろ!
キッチンペーパーは元のままです。

Drop lid removed:
落し蓋を取ったところ:

Looks delicious! (Gross?)
美味しそう!(気持ち悪い?)

Top with yuzu zest, if you can.
できれば柚子の皮を乗せて下さい。

Edited to add: I forgot to mention that I also made a cross cut on both sides of each daikon slice so that it could be seasoned more quickly.
Also, if you want to be authentic, parboil daikon in "kome no togijiru" (milky water resulting from washing uncooked rice) for 5 min. to 1 hour, depending on the recipe, for aku nuki (harshness removal) before simmering with ara.
追記:書くのを忘れていましたが、各大根の両面には十字の切れ込みを入れて、早く味が染み込むにしました。
また、ちゃんとしたいのであれば、大根はアラと煮る前に、あく抜きのため、米の研ぎ汁(お米を研いだ時にできる乳白色の水)で、レシピーにより5分から1時間、茹でて下さい。
As you may have already noticed, the final water + sake, soy sauce, and mirin ratio was 10:1:1 (900 ml water + 100 ml sake, 100 ml soy sauce, and 100 ml mirin), not 8:1:1.
すでに気付いているかも知れませんが、最終的な水+酒、醤油、みりんの割合は8:1:1ではなく10:1:1(水900 ml + 酒100 ml、醤油100 ml、みりん100 ml)になりました。

January 7, 2010

Final Post (for Now) about Ponzu/ポン酢に関する最後の投稿(今のところ)

I let the ponzu stand for a whole day, and then strained it.
ポン酢を丸一日寝かせてから、漉しました。

After straining it, let it sit for days, weeks, or even months before starting to use it so that it will become mellow.
I hope I can report on my ponzu again in a few weeks.
漉した後は、使い始める前に何日か、何週間か、また何ヶ月か寝かせ、熟成させます。
数週間後にまた私のポン酢について報告できればと思います。

References (Japanese only)/参考(日本語のみ):
Recipe 1
Recipe 2

January 6, 2010

Ponzu, Part 3(ポン酢、パート3)

From ten natsumikan, I was able to get more than 1 liter of juice. Initially, I was planning to use 500 ml of juice to make 1 liter of ponzu, and then I found that the capacity of the glass bottle I was planning to use was only 900 ml, so I decided to use 400 ml of it.
Thus, in the glass bottle, I combined:
400 ml natsumikan juice
400 ml soy sauce
100 ml mirin, microwaved for about 1 min. to evaporate alcohol
(Thus, citrus juice, soy sauce, and mirin ratio of 5:5:approx. 1)
40 g katsuobushi (dried bonito shavings)
10 x 5 cm kombu
(The more katsuobushi and kombu, the better!)
夏みかん10個から果汁が1リットル以上取れました。最初は果汁を500 ml使って、1リットルのポン酢を作ろうと思っていたのですが、それから使おうと思っていたガラス瓶の容量が900 mlだと分かったので、果汁を400 mlだけ使うことにしました。
と言うわけで、ガラス瓶に、次のものを混ぜました。
夏みかん果汁400 ml
醤油400 ml
味醂(みりん)100 ml(アルコールを飛ばすため約1分電子レンジで加熱)
(従って、柑橘果汁、醤油、みりんの割合は5:5:約1)
鰹節(かつおぶし)40 g
昆布10 x 5 cm
(鰹節と昆布は多ければ多いほど、いいです!)


Don't get the impression from the photo above that I am affiliated with Kikkoman. I simply wanted to suggest using Japanese soy sauce. Note that the mirin in the photo is not hon mirin (real mirin) but mirin-like seasoning called "jozo chomiryo".
写真を見て、私がキッコーマンと関係があると思わないで下さい。ただ日本の醤油を使うよう言いたかっただけです。また、写真の味醂は本味醂ではなく、醸造調味料と言う味醂風の調味料です。
The rest of the natsumikan juice was consumed by my two children and wife. The juice was so sour that I added two teaspoons of sugar to my children's glasses, but my wife is capable of drinking it with no sweetener!
残りの夏みかん果汁は二人の子供と妻が飲みました。とても酸っぱいので、子供たちには砂糖を小さじ2杯足しましたが、妻は甘味料なしでも平気で飲めます!
This post will be updated in a day or two.
この投稿は一両日中に更新します。

Ponzu (Continued)/ポン酢(続き)

The mixture must be let sit for at least 24 hours and then be strained before use, but I used it as a dressing, unstrained, for shredded cabbage (an accompaniment to tonkatsu) last night. It was quite good! All my family loved it! This morning, I used it as a sauce for cold tofu (hiyayakko). It was almost gone! So, I decided to use the remaining natsumikan to make another batch of ponzu.
(To be continued)
混ぜ合わせたものは最低24時間寝かせて、漉して(こして)から使うのですが、私は昨晩、キャベツの千切り(豚カツの付け合せ)のドレッシングとして(漉さないで)使いました。かなり美味しかったです!家族全員気に入ってくれました。今朝は冷奴(冷や奴、冷やっこ、ひややっこ)のソースとして使いました。もうなくなりそうです!そこで、残っている夏みかんを使ってポン酢をもう一回作ろうと思います。
(続く)