February 4, 2012

Fighting with Snow/雪と戦う

Let me explain how the people in Niigata fight with snow. As I said in the preceding post, here in Niigata, the air temperature is relatively high, and melting snow with groundwater is considered the most effective and the least expensive way.
Many people here have a private well on their premises, including me. Mine is 40-meters deep, and here is the submersible pump.
新潟の人たちがどのように雪と戦うかを説明します。先に述べたように、新潟では気温は比較的高いので、地下水で雪を融かすのが最も効果的で最も安価な方法と思われています。
私を含め、多くの人が敷地内に個人の井戸を持っています。私の家の井戸は40メートルの深さで、これが水中ポンプです。
Snow sensor unit (left) and control panel (right)
降雪センサー(左)と制御盤(右)
Yuusetsu you denryoku (electrical power for snow melting) is offered at a lower rate than home electrical power.
融雪用電力は家庭用電力より低料金で提供されています。

The pump supplies groundwater (about 14C) to this pipe, embedded in the concrete in front of the house.
ポンプは、家の前のコンクリートに埋められたパイプに地下水(約14度)を供給します。
The pump also supplies water to two ports, one on each side of the house.
また、家の両側にそれぞれある計2つの給水口にも地下水を供給します。
The left port:
左側の給水口:
Sunnyhose (product name) is connected to the port to sprinkle water to melt the snow.
サニーホース(製品名)を給水口に接続し、水を撒いて雪を融かします。
The right port:
右側の給水口:
The right port also supplies water to the two roofs.
右側の給水口は二つの屋根にも水を送ります。
I had PATEDISON's Shousetsu Sheet installed on the roofs, believing that this product was a dreamy one, one that could change the way the people here in Niigata dealt with snow. I am now totally saddened and depressed to learn that the Sheet does not live up to my expectations. THE COMPANY CLAIMS ON THEIR WEBSITE THAT THE SHOUSETSU SHEET REQUIRES ONLY ONE-FIFTH OF THE AMOUNT OF WATER USUALLY REQUIRED. I could sue the company!
私は、パテジソンの消雪シートを屋根に設置してもらいました。この製品が、新潟の人たちの雪の処理方法を変えれるような夢のような製品だと信じて。今では期待に応えない商品だと分かり、 完全に意気消沈しています。この会社は、HPで通常必要な水量の1/5しか必要としないと言っているんです。訴えたいくらいです。
Even though I have the well, the pump, and all other necessary equipment, I still need those tools to move the snow to where the water is:
井戸、ポンプなど必要な装置があっても、雪を水のあるところに動かすのにこのような道具が必要です。
All the above photos were taken in January, except some.
写真は一部を除いて一月に撮ったものです。

Today's newspaper:
今日の新聞:
which says that the snow accumulation in Yuzawa is 266 cm as of 5:00 p.m. on Feb. 3.
湯沢の積雪量は2月3日午後5時現在266 cmと書かれています。

A view from a window on the first floor of my house:
家の一階の窓からの景色:
Walls of snow:
雪の壁:

JR Muikamachi Station on Jan. 29/1月29日のJR六日町駅

This winter, we have had more snow than usual here in the Uonuma region of Niigata.
Here are some photos of JR Muikamachi Station (next station after Shiozawa Station) and surrounding areas, taken by me at around nine o'clock in the morning on January 29.
今年の冬は、新潟の魚沼地域には例年より多くの雪が降りました。
1月29日の午前9時ごろ撮った、JR六日町駅(塩沢駅の次の駅)とその周辺の写真です。
Snow dump (also called mama-san dump) and a shovel placed near a snow input port of the ryuu-setsu-kou (snow melting gully)
流雪溝(りゅうせつこう)の投入口(投雪口)の近くに置かれた、スノーダンプ(ママさんダンプとも呼ばれる)とスコップ。
You can see the snow melting system called shousetsu (snow melting) pipe along the center of the road. People here call this system "shoupai" for short. In short, this system is designed to melt snow using groundwater, which is about 14C. This is feasible because the air temperature is relatively high in Niigata. In colder areas where the air temperature can drop below -10C, this system cannot be used.
道路の中央に沿って「消雪パイプ」と呼ばれる融雪装置が見えます。地元の人は「消パイ」(しょうぱい)と呼びます。簡単に言うと、地下水(約14度)で雪を溶かす装置です。これは新潟は気温が比較的高いから可能であり、気温が-10C以下に下がるような地域では、この装置は使えません。
Radio station, FM Yukiguni
ラジオ局「FMゆきぐに」
National Route 17 runs from right to left.
国道17号線が右から左にあります。

Reference videos:
Snow dump video/スノーダンプのビデオ
Ryuusetsu kou (snow melting gully) video/流雪溝のビデオ
Shousetsu pipe video/消雪パイプのビデオ
All the videos are produced by someone else, not by me.
ビデオは私ではなく、他の人が制作したものです。

February 3, 2012

Soboro/そぼろ

Soboro is another example of a Japanese dish that can be made easily yet tastes so good.
The other day, I had to deal with so much snow around the house that I was in no mood for making supper, so I decided to make soboro.
Note that my soboro is made with ground pork, not ground chicken.
そぼろは、作るのは簡単、でもとても美味しい和食の一例です。
先日、家の周りの雪をたくさん処理したので、夕飯を作る気になれなかったので、そぼろを作ることにしました。
私のそぼろは鶏の挽き肉ではなく豚の挽き肉です。
Sorry, no description of the recipe.
レシピーの説明は省略します。

Making Onigiri with Ingredients Mixed in Them/具を混ぜ込んだおにぎりの作り方

Here is how to make onigiri with ingredients mixed in them.
具の混ぜ込んだおにぎりの作り方です。

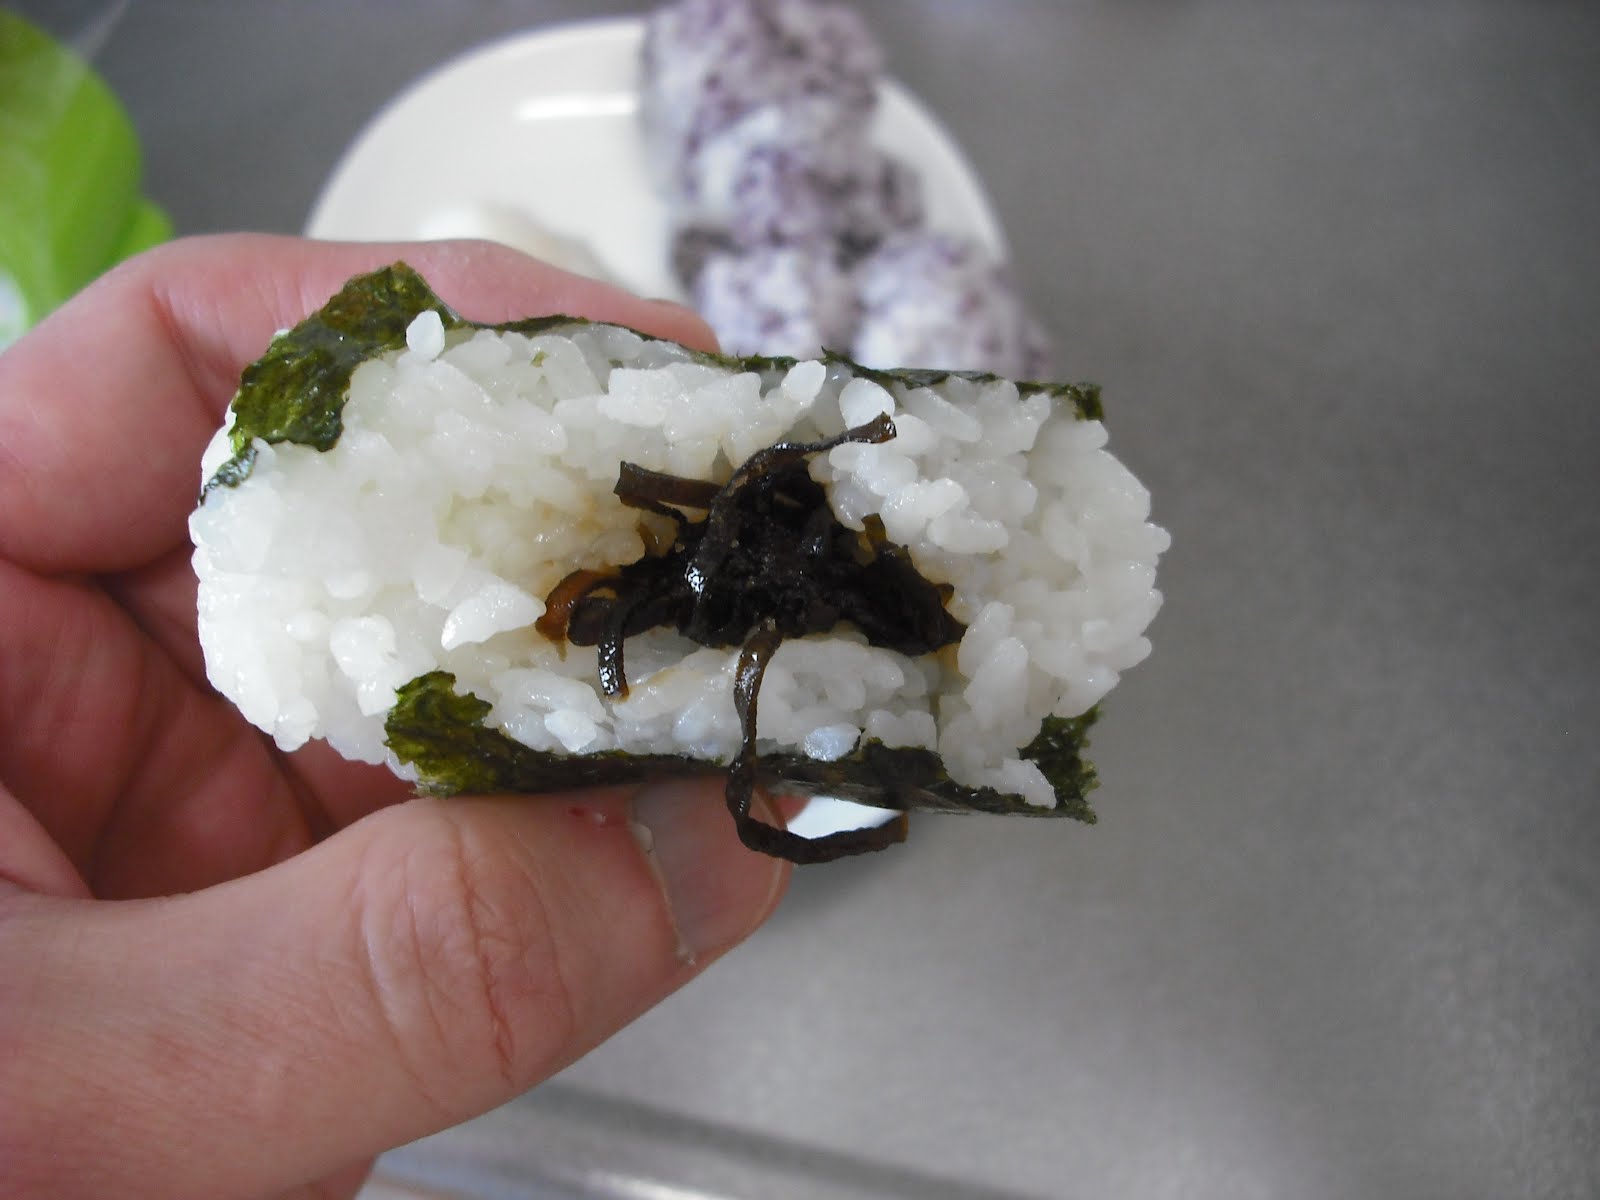
I first made two onigiri with salmon flakes as a filling and two others with salted kombu. I reheated leftover cooked rice in a microwave, and I mixed salt and water at a ratio of 1:1.
まず、鮭フレークを入れたおにぎりを二個作り、塩こんぶを入れたおにぎりも二個作りました。残りの冷や飯を電子レンジで温め、水と塩は1:1で混ぜました。
Then, I added some water to the salt water, simply because I didn't want to throw away the salt water. You don't have to use salt to make onigiri with ingredients mixed in them.
I mixed store-bought "Yukari" (seasoned red perilla leaves).
Note: Yukari is a registered trademark of Mishima Shokuhin Co., Ltd.

Directions are the same as those for making onigiri with fillings in them, except that you simply skip the steps for making a dent and putting a filling in it.
それから、塩水に水を足しました。ただ塩水を捨てたくなかったので。具を混ぜ込んだおにぎりを作る場合は、塩を使う必要はありません。
私は市販の「ゆかり」(味付けした赤紫蘇(あかじそ))を混ぜました。
注: 「ゆかり」は三島食品株式会社の登録商標です。

作り方は、具を入れたおにぎりの作り方と同じです。違う点は、窪みを作って、そこに具を入れるステップを省略することだけです。
I measured the weight of each onigiri, and it was about 85 g, except the rightmost one. As I said in the previous post, mine are smaller than the store-bought kind, which is about 100-110 g.
それぞれのおにぎりの重さを測ると、右端のを除いて、85 g程度でした。先に述べたように、私のおにぎりは市販のもの(約100~110 g)より小さいです。
Cross section of one onigiri:
おにぎりの断面:
Cross section of another:
別のおにぎりの断面:
As I said in the previous post, refrain from packing the rice tightly. Pack it loosely.
先に述べたように、ご飯を固く握らないように注意して下さい。ゆるく握って下さい。

January 26, 2012

Making Onigiri/おにぎりの作り方

Edited to add a note on Feb. 3.
I have done enough searching, and found that I need not make any changes to my present method but found that I have to add additional notes for clarity, so I have revised this post.
2月3日に注を追加:
十分に検索をして、現在の方法を変える必要はないが、明確にするため注をさらに書く必要があると分かったので、この投稿を改訂します。

Edited to add a note on Jan. 27:
Note: I will try to improve my way of making onigiri. When I'm satisfied with my new way, I will describe it in my blog.
1月27日に注を追加:
注: 私のおにぎりの作り方を改善しようと思います。新しい方法に満足したら、このブログに載せます。

As I said in the preceding post, my way of making onigiri has changed over the years, and the following is my most recent method:
前の投稿で述べたように私のおにぎりの作り方は年月を重ねるごとに変わってきました。最近の方法を説明します。

1. Making onigiri with filling in them
1. 中に具を入れたおにぎりの作り方

Setup:
準備:
In a container, combine water and salt at a ratio of 1:2.
容器に、水と塩を1:2で合わせます。
Dense salt water is superior to salt in solid form in that it serves two purposes at the same time: wetting your hands and seasoning onigiri with salt.
Note: Adjust the water-to-salt ratio to your preference in the range of, say, 1:2 to 2:1. One site even says to use 10 g salt and 100 g water.
濃い塩水は、手を濡らす、おにぎりに塩味をつけるという2つの目的を同時に果たすという点で固体の塩より優れています。
注: 水と塩の割合は、1:2~2:1の範囲で好みに合わせて調整して下さい。塩を10 g、水を100 g使うというサイトもあります。

Shown right are a bottle of salmon flakes with a spoon in it and a container with 3 g katsuobushi (dried bonito shavings) and 1 tsp soy sauce, with a pair of chopsticks on it. I am going to make two salmon flake onigiri and two okaka (= katsuobushi) onigiri.
Note: Popular fillings include:
Umeboshi, tuna mayo, grilled salmon, grilled tarako (cod roe), mentaiko (spicy code roe), kombu (pre-seasoned), okaka* (katsuobushi + soy sauce)
*Okaka is another name for katsuobushi (dried bonito) and kezuribushi (dried bonito shavings). This word is actually a nyobo koboba, but is now often used to mean a mixture of katsuobushi and soy sauce as a filling for onigiri.
右側にあるのは、サーモンフレークの瓶で、スプーンを入れてあります。それから、鰹節を3gとしょう油を小さじ1を入れた容器(箸が一膳)。サーモンフレークのおにぎりを二つ、おかか(鰹節)のおにぎりを二つ作るつもりです。
注: 人気のある具としては、
梅干、ツナマヨ、焼き鮭、焼きたらこ、明太子、昆布、おかか*などがあります。
*「おかか」とは鰹節や削り節の別名です。この言葉は実際は女房詞(にょうぼうことば)なのですが、おにぎりの具として鰹節としょう油を混ぜたものを指すことが多いです。


The bowl contains hot rice, and a large spoon is provided.
Note: Preferably, use just cooked rice. Otherwise, reheat leftover cold rice in a microwave. You cannot make decent onigiri with cold rice.
0. Wet your hands with salt water.
Note: Avoid wetting your hands too much.
1. Scoop an appropriate amount of rice, and place it on the palm of your left hand (if you are right-handed).
Note: Please read "your left hand (if you are right-handed)" as "one hand".
My onigiri are relatively small, about 85 g in weight, as compared with conbini (convinience store) onigiri, which are typically 100-110 g. I used to make much bigger ones, probably twice as large. My wife and children used to complain that they were too big for them. Now I make women- and children-friendly onigiri.
2. Make a dent at the center of the rice with your thumb.
Note: For a small amount of rice, you can easily make a dent with the thumb of the hand on which the rice is placed. For a larger amount, you may have to use the other hand to make a dent.
3. Put some ingredient (salmon flakes, for example) in the dent. (You may want to add some additional rice on top of the ingredient to fully cover it.)
Note: I personally don't want to add any additional rice because that will increase the weight of the onigiri.
ボールには熱いご飯が入っていて、大きなスプーンがついています。
注: できれば、炊き立てのご飯を使って下さい。でなければ、残りの冷や飯(ひやめし)を電子レンジで温めて下さい。冷や飯ではちゃんとしたおにぎりは作れません。
0. 塩水で両手を濡らします。
注: 手を濡らしすぎないように注意して下さい。
1. ご飯を適量すくい、左の掌(てのひら)に載せます(右利きの場合)。
注: 「左の掌(てのひら)...(右利きの場合)」は、「片手の掌(てのひら)」に読みかえて下さい。
私のおにぎりは、小さめで、約85 gです。コンビニのおにぎりは一般的に100~110 g程度です。以前はもっと大きな、多分、今の2倍くらいのおにぎりを作っていましたが、妻や子供たちが大き過ぎると文句を言うので、今では女性と子供に優しいおにぎりを作っています。
2. ご飯の中央に親指で凹みを作ります。
注: ご飯の量が少なければ、ご飯を載せた手の親指で簡単に凹み(へこみ)、窪み(くぼみ)を作れますが、量が多い場合は、もう一方の手で窪みをつけたほうがいいかも知れません。
3. 具(例えば、サーモンフレーク)を凹みに入れます(具の上にご飯もちょっと載せて、完全に隠してもいいです)。
注: 個人的には、ご飯を足すとおにぎりが重くなるので、やりたくないです。
4. Make the rice into a ball shape, with your both hands.
4. 両手を使って、ご飯をボールの形にします。
5. Place the ball of rice in your right hand. Support it with your palm and four fingers.
Note: Please read "your right and" as "one hand". I am surprised that all the people I checked on the Internet use their left hand to support the onigiri. I am also surprised that I find myself unable to turn onigiri properly with my left hand!
5. ボールにしたご飯を右手に置きます。掌と四本の指で支持します。
注: 「右手」は「片手」に読みかえて下さい。インターネットで調べた人はみな左手を使っておにぎりを支えているので驚きました。また、私自身は左手ではうまくおにぎりを回せないことに驚きました。
6. Make your left hand into a shape like this. (This photo is taken afterwards.)
注: Please read "your left hand" as "the other hand."
6. 左手はこんな形にします(この写真は後で撮りました)。
注: 「左手」は「もう一方の手」に読みかえて下さい。
7. Shape the onigiri into a triangle, making sure that your right palm and four fingers support the sides of the onigiri. Just support the sides, avoid packing the onigiri.
More specifically, shape the rice with your both hands, turn the onirigi by 120 degrees, shape, turn by 120 degrees, shape, turn by 120 degrees, and shape for the final (fourth) time. Again, DON'T PACK THE RICE, JUST SUPPORT IT.
Note: This step is really hard to explain. View the videos below if you find the description difficult to understand.
Let me add that I determine the depth of the onigiri while shaping and turning the onigiri by slightly pressing the sides of the onigiri with the palm and four fingers of the hand supporting the onigiri.
7. おにぎりを三角にします。この時、右の掌と四本の指がおにぎりの両面を支えてください。両面を支えるだけで、押し固めないようにしてください。
具体的に言うと、両手でご飯を成形して、120度回転させ、成形し、120度回転させ、成形し、120度回転させ、最後に(四回目)成形し終えます。繰り返しますが、押し固めずに、ただ支持してください。
注: このステップは本当に説明し難いです。分かり難い場合は、下記のビデオを見て下さい。
私は、おにぎりを握って、回す間に、おにぎりを支えている手の手の平(掌)と四本の指でおにぎりの両面を軽く押して、おにぎりの奥行きを決めます。
Done!
完成!
Note: I make it a point to shape four times and turn three times only to avoid packing the rice tightly. You may want to shape and turn more times to make your onigiri into a perfect triangle.
Some of the filling is visible on the surface, but I don't care. I sometimes intentionally make some visible on the surface so that I can tell what the filling is later.
注: 私はご飯を握り過ぎないよう、握るのは四回、回すのは3回だけにしていますが、おにぎりをもっと何回も握って、回して、完全な三角形にしても良いかも知れません。
具が一部、表面に見えますが、私は気にしません。後で具が何だかすぐ分かるようにわざと少し見えるようにすることもあります。

You can tell what the fillings are at a glance.
具が何か一目で分かります。
I had one onigiri without nori. I wrapped two in nori in my usual way, and one entirely in nori like my mother used to do.
一つは海苔なしで食べました。二つは私のいつもの巻き方で海苔を巻き、一つは、母がしていたように海苔を全体に巻きました。
Note: You may decide to wrap onigiri with nori at the time of eating to enjoy the crispy nori.
注: パリッとした海苔を楽しみたければ、食べる時に海苔を巻いてもいいです。

References:
参考:
Basics of Cooking: Making Onigiri/料理の基本 おにぎりの握り方
Video teaching you how to make rectangular onigiri and cylindrical (tawara gata) ones .
三角形のおにぎりと俵形のおにぎりの作り方を教えるビデオ。
Making Salted Rice Balls/塩むすびの作り方
Video teaching you how to make simple "shio musubi" (salted rice balls)
Note that musubi and o-musubi are synonymous with onigiri.
単純な「塩むすび」の作り方を教えるビデオ。
「むすび」、「おむすび」は「おにぎり」と同義です。

January 24, 2012

Onigiri/おにぎり

Last Sunday, I made onigiri (rice balls) for my son.
日曜に、息子のためにおにぎりを作りました。

One important thing to remember when making onigiri is, "Make while the rice is hot."
おにぎりを作るときに大切なことの一つは、「ご飯が熱いうちに作る」ことです。

My way of making onigiri has changed over the years, and here is my present method:
0. Put some cold water in a container, and set aside.
1. Put some hot rice in a bowl.
2. Add a certain ingredient, mix well with a large spoon.
3. Wet my hands by dipping them in the container of water, scoop some rice with the spoon, and place it on my left hand.
4. Make the rice into a rectangle in my left hand, turning it with my right hand four times ONLY.
私のおにぎりの作り方は年を重ねるごとに変わって来ましたが、現在の方法は次の通りです。
0. 容器に水を入れて、置いておく。
1. ボールに熱いご飯を入れる。
2. 具を入れ、大きなスプーンでよく混ぜる。
3. 両手を水の入った容器に入れて濡らし、スプーンでご飯を取り、左手に置く。
4. 右手で4回だけ回しながら、左手でご飯を三角形にする。
5. Cut each sheet of nori lengthwise into four strips. Wrap each onirigi in one strip of nori.
6. Place one onigiri at the center of a sheet of plastic wrap.
5. 海苔一枚を縦に4枚に切る。おにぎりをそれぞれ一片の海苔で包む。
6. 一つのおにぎりをラップの中央に置く。
7. Wrap it this way first.
7. まずは次のように包む。
8. Then, wrap it this way.
8. それから、次のように包む。
Done!
完成!
My son took three of them with him. I had the rest for lunch that day.
息子は三つ持って行きました。残りはその日の昼食に私が食べました。

January 20, 2012

Ramen Nabe/ラーメン鍋

The last mushrooms (shiitake) went into ramen nabe after all.
最後のきのこ(椎茸)は結局、ラーメン鍋にしました。

I finely chopped the steams of the shiitake and put them in the tsukune.
椎茸の軸の部分は刻んで、つくねに入れました。
I cooked the nabe entirely on the gas stove in the kitchen.
鍋は台所のコンロで完全に火を通しました。
except some tsukune.
つくねを少し残した以外は。
I put a total of three servings of instant tonkotsu ramen noodles.
インスタントの豚骨ラーメンを全部で3人分入れました。
Cheap but surprisingly tasty!
安っぽいですが、驚くほど美味しかったです。